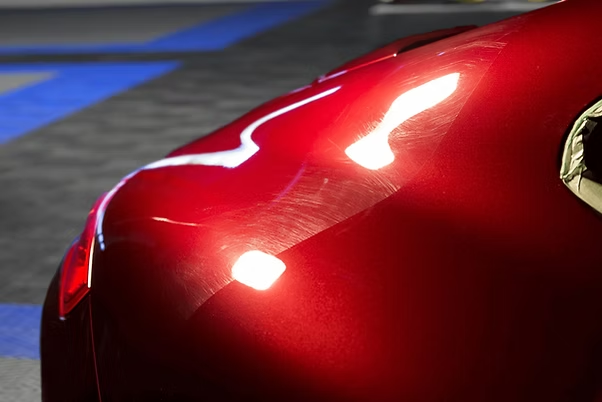
Paint correction is a meticulous process aimed at restoring a vehicle’s paint to its original, flawless condition by removing imperfections such as swirl marks, scratches, and oxidation. However, it’s a task that requires precision and expertise, and even seasoned DIY enthusiasts can make mistakes. Here, we’ll discuss common paint correction mistakes and how to avoid them, ensuring your vehicle shines brilliantly without any hitches.

Mistake 1: Skipping the Washing and Decontamination Step
- Why It’s a Mistake: Neglecting to thoroughly wash and decontaminate the car before starting the paint correction process can lead to disastrous results. Dirt and contaminants can get trapped under polishing pads, creating more scratches rather than removing them.
- How to Avoid It: Start with a thorough wash using a high-quality car shampoo and a microfiber wash mitt. Follow this with a clay bar treatment to remove embedded contaminants. This step is crucial for creating a clean surface ready for polishing.
Mistake 2: Using the Wrong Polishing Pads and Compounds
- Why It’s a Mistake: Using incorrect pads and compounds can either be too aggressive, removing too much clear coat, or too mild, making the correction process ineffective. Each type of defect requires a specific combination of pad and compound.
- How to Avoid It: Understand the types of imperfections on your paint and choose the right pad and compound accordingly. For deeper scratches, start with a more abrasive combination and finish with a finer one for minor imperfections and a polished look. Always test on a small area before proceeding.
Mistake 3: Overworking the Paint
- Why It’s a Mistake: Overworking an area can cause the clear coat to overheat and damage the paint permanently. It can lead to burns, swirls, or even paint removal.
- How to Avoid It: Work in small sections (about 2ft x 2ft) and keep the polisher moving consistently. Avoid staying in one spot for too long. Use appropriate pressure and monitor the heat buildup. If the area feels hot to the touch, give it time to cool down.
Mistake 4: Not Using Proper Lighting
- Why It’s a Mistake: Poor lighting can make it difficult to see the true condition of the paint, causing you to miss imperfections or over-correct areas.
- How to Avoid It: Invest in proper lighting, such as LED work lights or detailing lights. These lights mimic natural sunlight and reveal paint defects clearly. Always inspect the paint under different angles and lighting conditions.
Mistake 5: Failing to Remove All Residue
- Why It’s a Mistake: Leaving polishing residues on the paint can attract dirt and contaminants, leading to further damage and reducing the quality of the correction.
- How to Avoid It: After polishing, use a clean microfiber towel to thoroughly remove all residues. A quick detailer spray can help ensure all residues are lifted, leaving a clean surface.
Mistake 6: Skipping the Paint Thickness Check
- Why It’s a Mistake: Not checking the thickness of your paint can result in removing too much clear coat, which can permanently damage the paint and reduce its protective qualities.
- How to Avoid It: Use a paint thickness gauge to measure the clear coat before starting. This tool helps you understand how much material you can safely remove. Be cautious around edges and high points where the clear coat is typically thinner.
Mistake 7: Ignoring Environmental Factors
- Why It’s a Mistake: Environmental factors like dust, humidity, and temperature can affect the paint correction process. Dust can cause new scratches, and high humidity can interfere with the effectiveness of polishing compounds.
- How to Avoid It: Work in a controlled environment, ideally indoors. Ensure the area is clean and free of dust. Maintain a moderate temperature and humidity level to optimize the performance of polishing compounds.
Mistake 8: Not Using Masking Tape
- Why It’s a Mistake: Failing to use masking tape can result in polishing compounds staining rubber seals, plastic trim, and other non-painted areas, which can be difficult to clean off.
- How to Avoid It: Apply masking tape to protect areas such as rubber seals, plastic trim, and emblems. This will keep these parts free from polish residue and prevent accidental damage.
Mistake 9: Improper Polisher Handling
- Why It’s a Mistake: Improper handling of the polisher, such as using too much pressure or incorrect speed settings, can cause more harm than good.
- How to Avoid It: Read the polisher’s manual and practice proper technique. Use moderate pressure and appropriate speed settings based on the stage of correction. Let the polisher do the work rather than forcing it.
Conclusion
Auto Paint correction is a rewarding process that can dramatically enhance your vehicle’s appearance, but it requires careful attention to detail and proper techniques. By avoiding these common mistakes and following best practices, you can achieve a flawless finish that protects and preserves your car’s paint. Whether you’re a DIY enthusiast or a professional, understanding and implementing these tips will ensure your paint correction efforts are successful and your vehicle looks its best. For top-notch auto detailing services in Calgary, visit Cardetailcalgary.com for unmatched quality and care.


